Field of Science
-
-
Change of address1 year ago in Variety of Life
-
Change of address1 year ago in Catalogue of Organisms
-
-
Earth Day: Pogo and our responsibility1 year ago in Doc Madhattan
-
What I Read 20241 year ago in Angry by Choice
-
I've moved to Substack. Come join me there.1 year ago in Genomics, Medicine, and Pseudoscience
-
-
-
-
Histological Evidence of Trauma in Dicynodont Tusks7 years ago in Chinleana
-
Posted: July 21, 2018 at 03:03PM8 years ago in Field Notes
-
Why doesn't all the GTA get taken up?8 years ago in RRResearch
-
-
Harnessing innate immunity to cure HIV10 years ago in Rule of 6ix
-
What kind of woman would pray for health or use spiritual healing?10 years ago in Epiphenom
-
-
-
-
-
-
post doc job opportunity on ribosome biochemistry!11 years ago in Protein Evolution and Other Musings
-
-
Blogging Microbes- Communicating Microbiology to Netizens11 years ago in Memoirs of a Defective Brain
-
Re-Blog: June Was 6th Warmest Globally12 years ago in The View from a Microbiologist
-
-
-
The Lure of the Obscure? Guest Post by Frank Stahl14 years ago in Sex, Genes & Evolution
-
-
Lab Rat Moving House14 years ago in Life of a Lab Rat
-
Goodbye FoS, thanks for all the laughs15 years ago in Disease Prone
-
-
Slideshow of NASA's Stardust-NExT Mission Comet Tempel 1 Flyby15 years ago in The Large Picture Blog
-
in The Biology Files
iGEM - student power!
Graduation!
Exam Term
Reflections on Lab Work
Idea Space
This is why scientists need friends. And I discovered over the summer that this especially applies to friends who are also art and design students. Because while you're busy squinting at gels and trying to convince yourself you have a band 2kb long they are getting excited at the fact that you have purple bacteria, actual purple bacteria, and they're thinking of all the amazing things you can do with that.
I'm still recovering from jet lag a little, so I'll try to put this in context just using pictures. This is what I see:
Once you've stopped sniggering at the fact that it is a case of coloured poo, it starts to dawn that this is actually a very elegant system for searching for intestinal problems. taking bacteria that turn different colours in response to different conditions can result in a full spectrum (as it were) of the conditions in your stomach, just from looking at your poo. And doctors generally do look at poo to check how a patient is doing, this just gives a clearer picture.
And once you start thinking about it, there are a huge number of applications for coloured bacteria. Here's a few I've thought up over the course of the last few weeks:
- Putting the colours into spores (e.g from B. subtilis) could give you little dots of colour: bacterial pixels
- Industrial fermentors use bacteria and yeast. Adding conditional-dependant colours could allow you to check the conditions (i.e temperature, pH) without needing monitoring equipment, the bacteria just tell you themselves.
- Bacterial pigments for the pigment industry in general, there is a whole range of different colours in nature, you could make them into paint/dyes/etc just with a fermentor.
- Moving bacterial art. Bacteria swarm in the direction of food sources. Swarming coloured bacteria would be awesome, they'd look like that bit near the end of 2001:A Space Odyssey where he does the trippy planet landing.
- And of course, environment monitoring. Get lead sensing bacteria, drop possibly-contaminated water on them, leave in the incubator overnight and if the thing turns bright red the water isn't safe. Easy, convenient, and potentially quite cheep.
This is a massive shoutout to the two design students (who know who they are!) who helped me and my fellow lab rats retain our sanity over the holidays. You took our humble experiments and took them in such wonderful, marvelous directions, and at the end of it all you managed to get a case of coloured poo past Heathrow Airport security. And to all design students anywhere who are working with science; trust me, we need you. :)
America!
Expect some residual synthetic biology stuff when I get back! I'm hoping to scribble down enough for a post while I'm there, and type it up when I get back. I could bring my laptop along, but I'm trying to keep my luggage down to hand-luggage and I suspect I wouldn't have the time. Also, I'm not quite sure of the etiquette of conference-blogging. Some of this stuff might have publishing-potential but not yet been constructed into a paper, and I don't want to accidentally 'out' someones research.
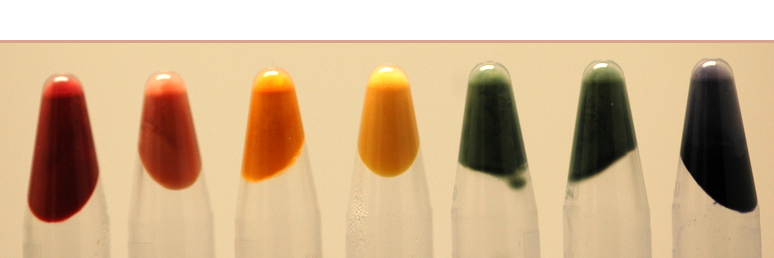
As a quick teaser, here's a picture of what me and my fellow summer-project lab rats will be taking about. All the pigments were made in E. coli:
Changing Projects
I've enjoyed this project. It's been fun, I've got to meet new people, and I've learnt a lot of new and very useful techniques, particularly involved in genetic manipulation (ligation, restriction, PCR etc). I've also learnt something very important. That wherever the winding road of life may take me, it is unlikely to take me very far in the direction of synthetic biology.
It's an interesting and very exciting field, it's just not one I feel I could survive a project in. These ten weeks have been long enough, now that the novelty has worn off, I'm beginning to realise that this just isn't the area of science I'm interested in. I like exploring bacteria, how they work, what they do, how they interact with the world around them. Synthetic bacteria doesn't really cover that; it uses bacteria, sure, but only as DNA-expressing chassis for carefully constructed molecular circuits. Circuits just don't hold my interest for the length required for an in-depth project.
I can see how it could be an interesting field, for engineers becoming excited in the natural world, or biologists who suddenly realise they have a passion for circuitry and building biological machines. But not for nerdy little microbiologists who get far too excited about how bacteria behave in the worlds they inhabit, how they deal with the dangers and the changes and the constraints of the physical world.
I can't wait to get into my new lab. A whole week of safety talks is going to be...so... irritating...
Stages of Design
My first design was simple enough...the operon (a set of genes one after the other) surrounded by the biobrick prefix and suffix
For this design I used the whole vio operon, including all the bits at the beginning and end that weren't part of the gene. I was scared of cutting anything out, in case we got our nice designed gene back and it didn't make any product at all.
However, when I looked at the sequence I found that the genes within the operon were out of line. Each amino acid (the blocks that make up proteins) is coded for by three bases, for example the sequence AAAGGG will make two amino acids. AAA = lysine and GGG = glysine. However on my operon this was out of alignment; instead of getting XXX / AAA / GGG / XXX, I was getting XXA / AAG / GGX
To counter this I re-designed it, putting all the genes as separate blocks and double checking that they all made the correct proteins:
The end result was a little cramped, but it meant all the proteins were being produced as displayed, along with the prefix, suffix, and a ribosome binding site at the start of the gene.
So I showed it to my supervisor. Who looked at it, and then looked at me, and then said in a very kind voice, "Why do you *need* all that stuff around the genes?"
The thing is I'm a little afraid of taking it out. Just in case there's some sort of importance to it. But in terms of genetic engineering, and further gene manipulation, it's more useful to have each gene smartly laid out, with it's own ribosome binding site. We also want to add a promoter (at the suggestion of the ever-wonderful DNA2.0) which is a kind of START site for the gene, and allows it to be turned into mRNA (which is then turned into proteins). As the operon product has some antibiotic properties (if they're expressed at too high a level they can kill the bacteria), we want it under an inducible promoter as well, so we can turn this operon on and off by adding different chemicals to the bacteria.
So here is my plan at the moment:
I'm showing it to my supervisor today. I really hope it's good enough, I want to get this sequenced.
(as a point of interest, these are only a subset of the different versions currently on my computer. I also have variations on all of the above with codon optimisations, restriction sites removed and added, and different/differently placed ribosome binding sites)
EDIT (added after meeting)
I showed him the design, and this time it was pointed out that I was missing a gene...
How embarrassing.
But the rest of the design was good! So it looks like this will be the final product, bar a little fiddling about with the actual sequence:
When corporations are AWESOME
In order to get on of our pigments, we need to synthesise a piece of DNA. A very large piece of DNA, that would normally cost around £3000 to get synthesised, effectively blowing our synthesis budget for this project. I've been spending most of last week agonising about how much of the actual gene we wanted to synthesise, I didn't want to cut too much out, in case it stopped working.
I got an email from my supervisor last night: DNA2.0 have agreed to synthesise is for us.
For free.
Free!
They also have awesome free software you can use to send them the bits you want synthesised.
You can move the little DNA arrows around into different orders as well. And colour code them if you want. It works a little slow, but I think that just might be my computer.
I'm still in a little happy daze from the offer to be honest. It is going to make the whole project so much easier and quicker.
How to (almost) damage expensive equipment
One of the things we're working on at the moment is pigments, which we want to characterise by measuring the fluorescent spectra they give off. Very easy in a plate reader. Characterising one of them yesterday, we took the cell-samples, lysed the cells, extracted the pigment with acetone and then loaded them into the wells for the plate reader.
Luckily, someone left the wells out on the bench for a while before loading them. Because when we came to load them we immediately noticed one vital and unforgotten fact...
Acetone melts plastic.
The acetone from the extraction had melted right through the bottom of the wells. If that had been in the machine the sample would have dripped through onto the lens, which is apparently *very* expensive, and put the whole machine out of commission.
ooops...
Creating Biobricks
The BioBrick part (shown bracketed in blue) contains the actual gene. In my case, the gene for the brown pigment melanin. The little circles on either side are restriction sites, enzymes can cut the DNA at these places, allowing the BioBricks to be moved around and, if necessary, stuck together. The red brackets show the plasmid. The purple square labelled 'origin' is the origin of replication, allowing the plasmid to be copied within the bacterial cell. The green 'antibiotic resistance' box is a marker, to check whether the plasmid has entered the cell. The plasmids are put into the bacteria in a process called transformation, after which the bacteria are plated out onto antibiotic plates. Only those which contain the plasmid are able to survive.It works well on paper. And it seems to work quite well in real life. There is even a registry of standard BioBrick parts, you can order them and mix them together to form biological engineering systems. They tend to work as well, with varying degrees of success, and if all goes well hopefully my little brown pigment plasmid will be in there as well one day. All I have to do is cut the gene out of the plasmid it's currently in, remove unwanted restriction sites, and stick it into the red-bracketed plasmid shown above.
This can all be done by PCR =D
(If I get totally stuck with it, the other option is just to get the gene synthesised and stick it straight into the plasmid. Easier...but more expensive)
Bacterial Photography
So...for this week, bacterial photography:
The picture above (image courtesy of UT/UCSF) is a coliroid, a picture taken by shining light onto a bacterial plate. This is done by putting genes that produce a black pigment under the control of a light-sensing bacteria. Bacteria in the light do not produce pigment, those in the dark do, creating a photographic image when light is shone on to a lawn of bacteria.A more in-depth explanation of what is happening is shown in the diagram on the right
When light is present it blocks this activation process by stopping the action of the photoreceptors. Bacteria in the light will therefore not produce pigment, while those in the dark do produce pigment, leading to a darker colour on the agar plate.
The main challenge involved in this process was creating the photoreceptor. E. coli (the bacterial species used for this procedure) do not have any proteins for sensing light. Instead, a light sensing protein from a cyanobacterium was used, and held in place by fusing it to a trans-membrane protein (in the diagram above the cyanobacterium receptor is the green blob while the E. coli trans-membrane protein is the dark black line). This creates a chimeric protein, which can be put on a small circle of DNA (known as a plasmid) and inserted into the bacteria, along with the genes for the pigment. The bacteria can then be grown on a large plate, ready to be used for photography.
What to do with DNA
Restriction enzymes are naturally produced by most bacteria, and what they do is cut pieces of DNA at very specific points. EcoRI, for example, cuts DNA after the G in the DNA sequence GAATTC. As each viral genome has a different DNA sequence, each one will produce a different restriction map, producing a characteristic number of bands on a gel:
(this picture is not from my research, it is from here)Each band is a blob of a certain size of DNA lit up with ethidium bromide (which is a dye, nothing very exotic). Different restriction enzymes, and different genomes, will produce different band patterns on the gel.
So, what do the bacteria need to produce DNA cutting enzymes for? The answer (naturally) is bacteriophages! One way the bacteria can protect themselves against viral invasion is to have lots of these enzymes around. As soon as the viruses inject their DNA into the bacteria cell, the restriction enzymes chop it all up.
But bacteria also contain DNA, and unlike people (and other eukaryotes), they don't keep it all tucked up in a nuclear membrane. So how do they stop the restriction enzymes from cutting up their DNA? One of the most common ways is to methylate the DNA, essentially sticking a methyl group (a carbon atom attached to three hydrogen atoms) onto some of the bases. in the example shown above, therefore, the restriction enzyme is looking for the sequence GAATTC. It sees this in invading DNA and slices it up, but in the bacterias own DNA it sees GA(methylated)A(methylated)TTC, which it doesn't recognise. And therefore, does not cut.
Restriction enzymes were first discovered my Daniel Nathans, Werner Arber, and Hamilton Smith. They won the Nobel Prize for it in 1978. (see here)
Reflective Learning
The short answer is: A lot. I have enjoyed (almost) every minute of lab work, it's been frustrating at times, sure, but it's basically just been one hell of an awesome ride. The thing is, in my official 'reflective learning' thing I should probably focus on things of Practical Value. Various techniques and things I have picked up, information I have learned about working in a lab environment, an increased awareness of the workings of science etc.
In reality, of course, the things I've actually picked up are far vaguer and more interesting. So here is the unofficial version of what I've really got out of the whole experience. They don't tick any boxes in forms, but they are somehow a lot more important:
- Reflexes. I've gained a whole lot more reflexes and instinctive responses, to a vaguely Pavlovian turn of the head when an alarm goes off to a vital spacial awareness of where the end of a pipette tip is.
- What happens in a lab. Mostly washing up and cookery. The science comes in at the beginning when you write a protocol and at the end when you stare in confusion at your results. The bit in the middle is mostly cookery.
- Organisation. Oh ghod. Probably the best thing I've got from this is the beginnings of development of a healthy paranoia about labelling things. Label and date everything, even with the useless information.
- Small writing. I am getting very good at writing tiny labels on miniature eppindorfs.
- Pragmatism. Sometimes experiments work. Sometimes they don't. Life is not predictable. The lab may be scientific, but the organisms damn well aren't. That's how it is. Squint at the protocol, get new equipment, shrug, and do the whole thing all over. (and if it works, you cna spin round on your chair making sqeaky noises)
- Temporal awareness. Everything takes longer than you think. Everything.
- Orders of magnitude. Never underestimate the ability of an order of magnitude to suddenly vanish. There is a big difference between 10 and 100, which has a tendency to disappear at crucial times.
And hopefully that attitude will stay with me throughout next term, and encourage me to actually work hard :)
Speaking to computers
What I don't do is computers. I can think of over twenty ways to re-phrase the instruction 'look for the comma' (probably over thirty ways if I'm allowed to use the 'synonyms' feature in word) but not one of those ways works for a computer.
Unfortunately there are some things that even Lab Rats need computers for. For instance, searching for a particular domain of DNA, pulling all the results out of a standard BLAST search, and then taking only the relevant information from that. To slightly clarify, BLAST is a bioinformatics programme with a huge database of information about every known and officially sequenced protein and DNA sequence. You type in your sequence (or your name, if you feel bored) and it shows you what proteins it matches on the database. Unfortunately it provides quite a large amount of information about each one, so this is where programming comes in, you tell the computer which bits of the database you want.
Now I did do computer science for IGCSE. I know what pseudocode is, and how to use it, and could probably stab a guess at setting commands up in the right sequence as well. Where I fall apart is the bit after that, translating the pseudocode into computer speak. There are some phrases I quite literally cannot do.
e.g:
IF comma is present
THEN stop
concatenate new information to old (concatenate=attach or add to)
OK. Fine. That works. But how do you say 'comma is present' in computer? The comma is not equal to anything, so that's out. Nor is the comma in relation to anything, it's just a comma in the middle of the string of writing. I have no idea at all how to tell the computer to find me a comma, Perl (which I am using to programme) seems to have no random squiggle that means 'find' or 'look for'.
Another thing that flummoxed me was the concatenation. All the online tutorials showed you exactly how to concatenate, but only if you already knew what the phrases were:
Tutorial: To concatenate x and y type x.=y
Lab Rat: I DON'T KNOW WHAT X AND Y ARE!!! In fact I'm looking for them because I don't know what they are. I want to find that out!;
Tutorial: *is no help at all*
Lab Rat: *Kicks computer, then hold up a large picture of a comma in front of the screen* Just find this, OK? See this picture, find something that looks like this and then give all the writing in front of it to me;
(the semicolon is computer for 'end of line'. I do not know why computers do this when almost every living person uses a full stop).
Computer: *Is not impressed*
I did actually get there in the end, to the surprise and delight of both myself and my supervisor (and probably the computer as well) I managed to get it to do sort of what I wanted. Unfortunately when we looked back over the raw data from our BLAST results we realised that there was a lot more information we wanted, so a lot more code has to be written. And here we hit another problem. The BLAST databases are truly amazing but just not particularly well organised. Some of them have the important information stored under /notes, while others have a separate field called /function. One item we saw even had the full protein function listed under /name. This means that to get all the information we need, we'll have to pull out each of these fields for every single protein, which will provide us with a lot of useless notes that we don't really need.
Lab Rat: Just give me the useful stuff, OK?;
Computer: Variable 'useful' not defined. Random computer squiggles, out of cheese error.
Lab Rat: *gives up on computers*;
Computer: *gives up on Lab Rat*
Some People Juggle Geese
First, some that are just me being me:
"400 x 5 uh, yeah, that's 2"
"Oh shite, I've lost an order of magnitude"
"I'm going to pretend my lab coat is a trench coat"
"I'm actually beginning to doubt the existence of DNA."
"I can speak to computers!"
A couple of worrying ones:
"Ah. I didn't realise they were that expensive"
"Don't worry! I'm fine! The water just escaped."
"It seems that Agar at 50 degrees is not enough to remove fingerprints."
"Did you just hear the lid explode?"
And last, the vaguely baffling:
"My daisy is on the ice-box."
"Spot on seventy at a random twiddling of the twiddle."
"Shoogle it violently then go as fast as possible."
My favourite phrase is probably the "My daisy is on the ice-box" It has a slightly Monty Python-ish air to it.
When you don't know who to trust...
It also tells us how contaminated our sample is. The ratio of the 260/280 should ideally be between 1.8 and 2. Any lower and there is significant protein contamination, and higher and there's probably lots of salt or something in there.
Or so we thought. And so quite a few of the references and pages seemed to suggest. Until, of course, we got to the Wikipedia article. This tells us, in no uncertain terms, that it takes a relatively large amount of protein contamination to significantly affect the 260:280 ratio, and even provides a little table to show that. It provides a citation link as well, which I can't get to. I've tried Google and Pubmed until I went round in circles, but no one wants to give me that paper. At least not for free :(
So who do we trust? The wikipedia article has a solid-looking table, whereas in most of the other things we read it was just a throwaway line. On the other hand "most of the other things we've read" includes the instruction manual for the machine, which should know what it's talking about. And I have yet to read the wikipedia citation.
On reflection, I think I will disbelieve Wikipedia this time. At any rate, it hardly matters because we still don't actually have any DNA.
Ah well. At least I'm getting paid for it =D
PayDay
I chose to celebrate this great moment in my lifetime by spinning around very fast on my computer chair making squeaky noises. I still can't quite believe that someone has handed me a substantial amount of money for the most enjoyable six weeks of my holiday.
And the best thing is that due to an accumulation of reasons within the lab (and my long summer holiday) I have been allowed to stay a Lab Rat in September as well.
eeeeeeeeeeeeeeeeeeeeeeeeeeeeeeeeeeee!
As it would probably be a good idea to put something at least vaguely scientific in this post I tried to look up how autoclave tape is made. Autoclave tape looks exactly like masking tape except that it has fine white lines across it. It is also apparently slightly more sticky. You attach it to anything that you are about to put in the autoclave (which heats things up to very high temperatures in order to sterilize them) and as they are autoclaved the white lines go black. This allows you to tell instantly whether or not something has been autoclaved (and is also handy for holding stuff together).
Wikipedia says this:
"Autoclave tape is an adhesive tape used in autoclaving to indicate whether the correct temperature has been reached for the elimination of all living organisms (typically 121 degrees Celsius).[1]
Small strips of the tape are applied to the items before they are placed into the autoclave. The tape is similar to masking tape but slightly more adhesive, to allow it to adhere under the hot, moist conditions of the autoclave. The tape typically has diagonal markings containing an ink which changes colour (usually beige to black) upon heating. One such ink contains 30.1% lead thiosulfate, 0.6% magnesium carbonate, 20.1% neocryl B8141, 30.1% ethanol, 22.7% ethyl acetate and 49% ink solids. Unfortunately these percentages add up to more than 100%, so this data is completely bogus. "
Yes. Very helpful. The manufacturers aren't particularly keen on giving the secret away either. This maybe for complicated legal reasons or it may just be that it hasn't occurred to them that anybody would be interested in knowing what autoclave tape is made of.
DNA Extraction
First though, another quick notice from the Department of the Very Obvious:
- Do not try to do DNA extractions when hung-over
---
DNA Extraction
1.Grow the phages on agarose gel. Agar gel is a gelatenous substance from seaweed that contains both agarose and agaropectin. Agaropectin contains lots of acidic sidegroups (containings sulfur and various other things like pyruvate). Agar is usually used for gels as it's cheaper, but for DNA extraction you can't risk any of the acidic agaropectin loitering around as it stops the extraction enzymes from working. Instead you use just pure agarose.
2.Isolate phages. This is done by peeling off the top layer of agarose and using a centrifuge to spin it down to the bottom, leaving the phages in the supernatant (the liquid left behind after centrifuging). Push the supernatant through a couple of filters to remove anything else (bacteria mostly) and you're left with a pure phage solution.
3.Now the DNA extraction can start. The first instruction in the kit is 'add buffer L1'. Buffer L1 is a clever mixture of various different enzymes and buffer solutions which breaks down any bacterial RNA or DNA that might be left in your solution.
4.Next buffer L2 is added. This precipitates out the phage particles; essentially it clumps all the bacteriophage's together making them easier to extract.
5.Centrifuge to collect the phage. The centrifuge is the big fast-spinning machine that pellets all the phages down into a neat little, well, pellet. Very useful machine, and it would be even more useful if ours worked properly :(
6.Resuspend the phage in buffer L3. I suspect this is just a growth medium, to turn the phage pellet into a phage suspension.
7.Add buffer L4. Buffer L4 contains the well known SDS (which comes up very often in various extractions). SDS is a detergent which essentially breaks all the proteins down. As viruses pretty much just consist of proteins and DNA this means that the only whole thing left in the test-tube at this point is the DNA. Still quite a way to go though, so here's a diagram of a centrifuge:
8. Add buffer L5, mix and centrifuge. It does not actually say, but i suspect L5 is precipitating the proteins that have just been cut up. The centrifuge will then pellet the proteins down to separate them from our DNA.9. Equilibrate a QIAGEN-tip 20 by adding buffer QBT. This is where we hit the Magic Event Horizon (MEH) at top speed. I have no idea what is in the buffer or exactly how a QIAGEN-tip works, which is probably a good thing for copyright in general. You can get to QIAGEN to find out more about it by going here: QIAGEN
10. Allow the residue from step 8 to flow through the QIAGEN tip. One thing I do know about the tips is that they contain resin. The resin traps the DNA on it allowing the rest of the phage to wash through (essentially this will just be any liquid medium, as all the proteins have technically been removed by the centrifuge in step 8)
11. Wash the QIAGEN tip with buffer QC. This washes the DNA (which is trapped on the filter) removing any last impurities.
12. Collect DNA with buffer QC into a clean tube. The QC in some way (Magical Event Horizon fast approaching) allows the DNA to flow through the filter and into the new tube. Finally the DNA! We now (should) have a solution containing nothing but phage DNA. Just got to collect it.
13. Precipitate the DNA by adding isopropanol. Isopropanol is another old favourite, it just clumps DNA, making very very hard-to-see pellets. You've probably guessed by now but the next stage is: centrifuging, to collect the pellet.
14. Wash pellet with ethanol. Ethanol removes any residual salt as there will be some magnesium and various others in the DNA (DNA has an overall negative charge due to the phosphate backbone which collects positively charged salts). Washing involves adding ethanol, shaking very gently and then (surprise surprise) centrifuging to pellet the DNA again and remove all the ethanol.
15. Allow DNA to dry and redissolve in buffer. Buffer just keeps the DNA happy and stops it disintegrating.
And that's it! We now have a little glass bottle containing a solution of pure DNA.
Science really is just like cookery =D
Things I've learnt today...
uuurgh...
I had lots of interesting things to put in that discussion as well. It was going to be a good discussion.
Other things I've learnt:
- Don't waste time looking at random sites when you should be writing reports
- Don't do this so often that you end up writing the report the morning it's due
- Don't miss breakfast to write a report
- The pope is a catholic
- Bears really do shit in the woods.
:(
Good news though: We have phage! They grew, with no contamination, which means that tommorrow we get to slice them open and take their DNA out. YAY!!